A comprehensive look into the settings available inside of your account.
The Account settings tab is home to everything you need to put your own spin on your account. From uploading your company logo to enabling your ATS integrations, we explain everything here. Account settings are accessible by all users — though available options will depend on your user role.
Approx. reading time 5 minutes
In this article
- My profile
- Notifications
- My company
- Team management
- Plan & billing
- Integrations
- Assessment settings
- Common questions
My profile
Available for all users
My profile contains basic information about you. Your name and contact number are entered in the relative text boxes. This is also where you can change your email address, password, and account language settings as shown below.
Change password
To change your password:
| Click the Change password button. A popup window will appear. | |
| Enter your current and new passwords in the required boxes. Please ensure that your password meets the minimum requirements | |
|
Click Save. Your new password will take effect straight away. Press Cancel at any time to exit the window without making any changes. |
Change email address
To change your registered email address:
| Click the Change email button. A popup window will appear. | |
| Enter the required details into the text boxes. | |
| Click Change email to save your change. Click Cancel at any time to exit without making any changes. | |
|
Click Verify email address on the confirmation email you receive. |
Click Save changes when finished to ensure any alterations take effect.
Changing language settings
Available for all users
You can change the language of your account interface to 12 different languages:
- English
- Danish
- Dutch
- French
- German
- Italian
- Japanese
- Norwegian
- Polish
- Portuguese
- Spanish
- Swedish
- Polish
To change your account language:
| Navigate to the My profile page. | |
| Scroll down to Language selection, and use the dropdown menu to make your choice. | |
|
Click Save changes and the page will refresh in your chosen language. |
Notifications
Available for all users
Maybe you're waiting on a small handful of candidates to complete an assessment. Or perhaps you're the type of person who sets things up and forgets about them unless reminded: out of sight out of mind, right? We created email notifications for you!
We currently offer notifications for:
- Every time a candidate completes an assessment
- A daily summary of all candidates who complete an assessment
We have a full article dedicated to Notifications which explains how to use them.
My company
Available to account owner and admin users on the Pro plans.
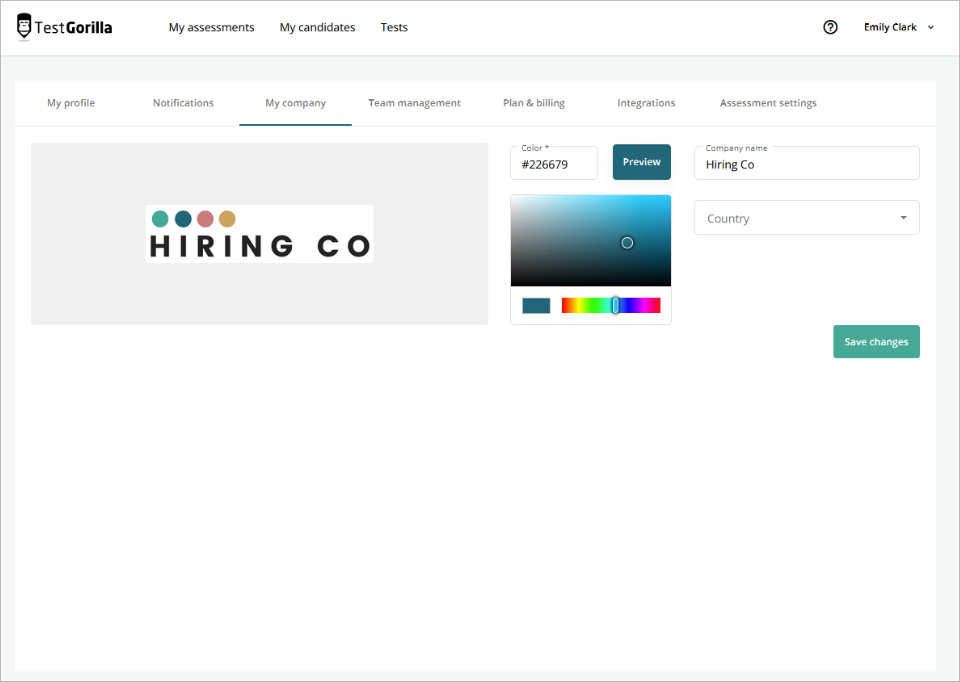
My company allows the account owner to personalize the account. They can set the company logo, color, and name to be displayed on assessments and email communications. Adding these little flairs make them fit your company image and branding that much more!

Company logo and color
Available to users of the Pro plans
You can brand your assessments with your company logo and main color to help provide a more in-house feel to your assessments.
Logo
You can set your logo using 2 methods:
- Drag & drop your company image onto the image box.
- Click the image box to open your file explorer and select the file from there.
Don’t worry if your logo changes often — seasonal changes, for example — you can change it as many times as you want!
Color
There are also 2 ways for you to set your company color scheme:
- Enter the HTML Hex code in the text box labeled Color
- Find your color manually using the color selection tool.
Your color scheme will reflect both in your assessments and on all communications sent from our platform, affecting buttons, links, and checkboxes, among others.
| Tip: Take a look at our Candidate communications article to see how you can preview your invitations. |
Company name and Country
Company name
Your company name can be edited by clicking the text box labeled Company name and editing the text in it.
Adding your company name gives you the ability to use a company specific token when customizing your candidate invitation email.
Country
You can select your country from a drop-down. This information is completely optional. TestGorilla uses it for demographic purposes, enabling us to better support you.
Click the box to produce a dropdown menu. You can then search for your country — by scrolling or typing it — and select it.
Remember to click Save changes before leaving the screen!
Team management
Available for users with the account owner, admin, and recruiter role.
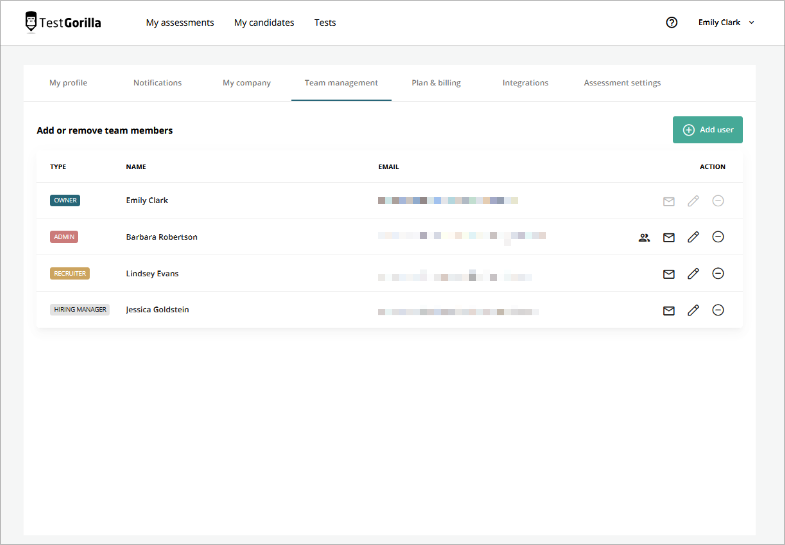
The team management pane shows all the members of your team along with their assigned roles.

User roles
User roles dictate the permissions a particular user has. There are 4 roles available:
- Account owner
- Admin
- Recruiter
- Hiring manager
You can see our guide on managing your team for full details of each, along with how to add and remove users.
Plan & billing
Available to all users
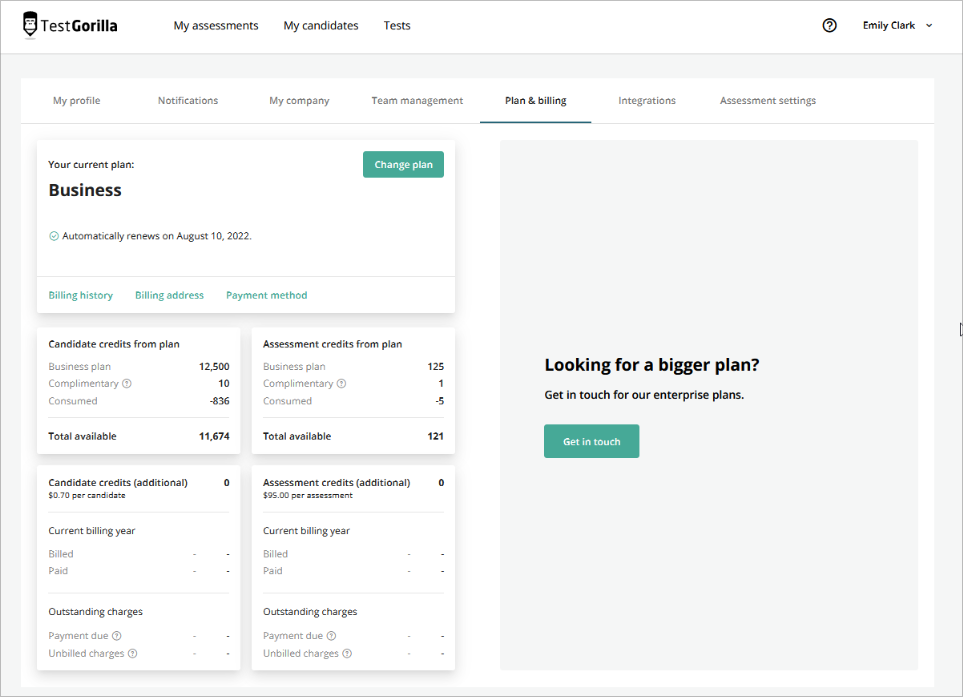
Plan & billing allows access to all billing-related functions. Account owners can upgrade or downgrade the account, download invoices, and change their payment details.

All other registered users can view information related to the current plan — such as credit usage and outstanding charges — but cannot make any changes.
For more information about what is in this section, please see our Guide to your plan & billing.
Integrations
Available for Pro plans.
You can activate your ATS integration from the Integrations tab. The Integrations section of our help center details the steps you will follow for each ATS.
Users on the Pro plan also have access to our API for custom ATS integrations. You can find the documentation here.
Assessment settings
Available to account owner
This tab is only available to the account owner, with applied settings affecting assessments created by any user. You can un/check the boxes based on your desire to turn features on and off.
The options here include:
- Demographic feedback. With this option selected, candidates will be presented with a short questionnaire at the end of the assessment, gathering basic information that allows us to maintain fair and unbiased tests. This section is optional for the candidate, and any collected information remains anonymous. TestGorilla doesn’t share this information with you or anyone else.
- Test feedback. We will ask the candidate for feedback on each test after they have completed it. Collected information is anonymous, and is used solely for research purposes. Again, this step is optional for the candidate.
Common questions
Why aren’t all of these options available to me?
My company and Assessment settings can only be accessed by the account owner. Integrations are only available to Admins and Owners on the Pro plans. If you do not have the particular user role — or are not on the relevant plan — these options will not be available to you.
Why do you collect demographic information on candidates?
TestGorilla’s goal is to make jobs accessible to everybody, regardless of their background, race, or location. This survey allows us to collect very basic information to ensure we are meeting our goals. None of this information is shared with anybody — we use it purely for research purposes. It is also collected anonymously to protect the test-taker’s privacy.